

Self-Hosting Guide
Recogito Studio is ready for self-hosting and these instructions detail the steps necessary for deployment on Ubuntu Linux, v24 (although many earlier versions will also work as well). The deployment strategy utilizes Docker, Docker Compose, and Nginx.
Because everything runs in Docker behind Nginx, you can host Recogito Studio on any server that meets the requirements below, including a cloud VM (DigitalOcean, AWS EC2, Hetzner, Linode, etc.) or your own hardware. The steps assume a Debian-based distribution; the examples were written against Ubuntu 24.
System Architecture
Section titled “System Architecture”Self-hosted Recogito Studio runs as a set of Docker containers: the Astro client, a Supabase/Postgres backend (with MinIO object storage and a Cantaloupe IIIF server), and Portainer for container management. See the architecture overview for the high-level model, or the reference docs for detail.
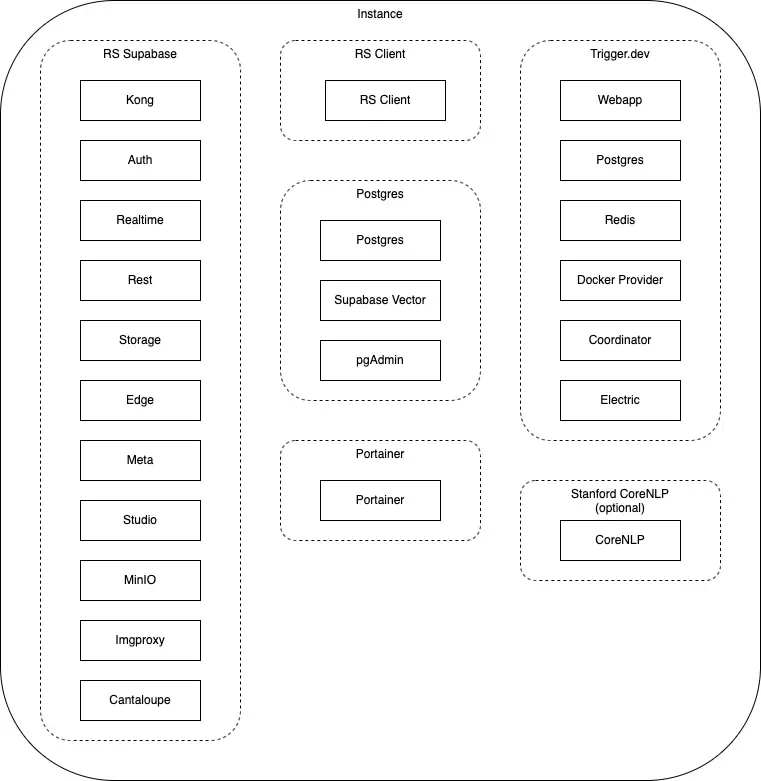
Additional Services
Section titled “Additional Services”- Trigger.dev - Background job system. Required for project import/export, and also used by plugin-ner. Use managed Trigger.dev Cloud or self-host it; see Set Up Trigger.dev.
- Stanford CoreNLP - Natural Language Processor. Optional; required only for plugin-ner.
Domains and DNS
Section titled “Domains and DNS”Point the hostnames you use at your server’s public IP with DNS A records (or a single wildcard record). Two services are used by your end users’ browsers and must be reachable at a public hostname:
client.example.com— Client applicationserver.example.com— Supabase API, which the client calls directly
The other three are operator-only management UIs. Give them hostnames if you want browser access over HTTPS, or skip public DNS and reach them privately (over an SSH tunnel, or by IP and port) to reduce your attack surface:
portainer.example.com— Container managementpgadmin.example.com— Database administrationminio.example.com— Object storage console
If you self-host Trigger.dev and expose it over the web, add one more, such as trigger.example.com.
The subdomain names are conventions, not requirements. You choose the base domain and the hostnames—they are wired up through your .env (SITE_URL, API_EXTERNAL_URL) and the Nginx site configs, so nothing is hardcoded.
System Requirements
Section titled “System Requirements”- Operating System: Ubuntu Linux v24 recommended; other Debian-based distributions should work
- Memory: Minimum 4GB
- Storage: 80GB+ recommended
- Network: Public IP address with DNS access
Installation Steps
Section titled “Installation Steps”1. Create and Secure Your Server
Section titled “1. Create and Secure Your Server”Provision a Server
Section titled “Provision a Server”Provision an Ubuntu 24 server that meets the system requirements above—at least 4GB RAM, 2 CPUs, and 80GB storage—with SSH access and a public IP. Note its public IP address, and enable automatic backups for production use.
New to cloud servers? DigitalOcean’s droplet creation guide is a good starting point, but any provider or on-premises machine works.
Set Up Non-Root User and Firewall
Section titled “Set Up Non-Root User and Firewall”These steps follow DigitalOcean’s initial server setup guide. Connect to your server:
ssh root@your_server_ipUpdate the system:
apt updateapt upgradeCreate a new recogito user with sudo privileges:
adduser recogitousermod -aG sudo recogitoConfigure the UFW firewall:
ufw app listufw allow OpenSSHufw enableufw statusIf your provider has its own firewall or security groups (AWS, GCP, etc.), apply the equivalent rules there as well—some clouds block ports upstream regardless of UFW.
Best practice is to not utilize the root login except in special circumstances. Go ahead and exit the instance and SSH in with the new recogito user.
exitssh recogito@your_server_ip2. Install Nginx
Section titled “2. Install Nginx”Install and configure the web server:
sudo apt updatesudo apt install nginxAdjust firewall for web traffic:
sudo ufw allow 'Nginx Full'sudo ufw statusVerify Nginx is running:
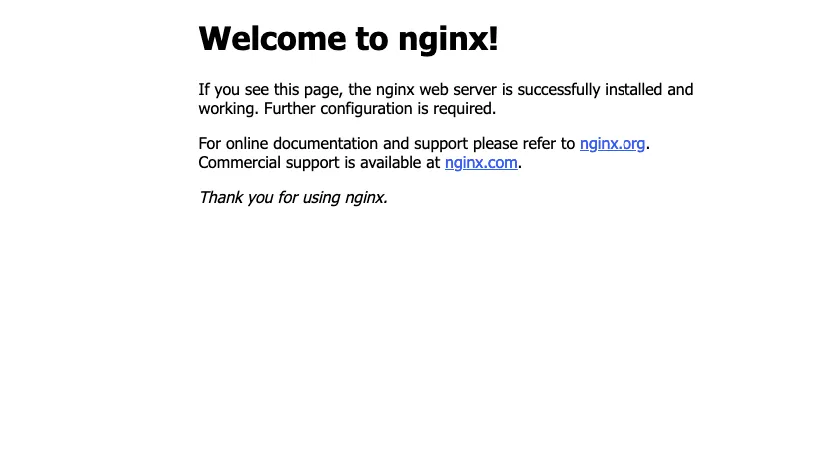
systemctl status nginxTest by navigating to http://your_server_ip - you should see the Nginx welcome page.
3. Install Dependencies
Section titled “3. Install Dependencies”Verify Git is installed:
git --versionDocker
Section titled “Docker”Install Docker Engine and the Compose plugin by following Docker’s official install instructions for your distribution. On Ubuntu, the quickest option is the convenience script:
curl -fsSL https://get.docker.com | sudo shInstall Node Package Manager:
sudo apt install npm4. Clone and Configure Recogito Studio
Section titled “4. Clone and Configure Recogito Studio”Clone the repository:
git clone --depth 1 https://github.com/recogito/recogito-studio.gitcd ./recogito-studioCopy and edit environment variables:
cp ./docker/.env.example ./docker/.envnano ./docker/.env5. Critical Environment Variables
Section titled “5. Critical Environment Variables”Update these required values in your .env file:
Passwords and Secrets
Section titled “Passwords and Secrets”Some values are passwords you choose (you’ll log in with them); the rest are random secrets you generate with a command and never type by hand.
Passwords you choose:
DASHBOARD_PASSWORDrequired — Supabase Studio login (must include at least one letter)DASHBOARD_USERNAMEoptional — username for the Supabase Studio login. Defaults tosupabase.ORG_ADMIN_PWrequired — password for the initial admin user (admin@example.com)
Random secrets (run the command and paste the output):
POSTGRES_PASSWORDrequired —openssl rand -hex 24(hex avoids characters that break Postgres connection strings)VAULT_ENC_KEYrequired —openssl rand -hex 16(32 characters)INVITE_CRYPTO_KEYrequired —openssl rand -base64 32
Identifier:
POOLER_TENANT_IDrequired — any unique string, e.g.recogito
JWT Secret and API Keys
Section titled “JWT Secret and API Keys”Recogito uses Supabase’s legacy JWT-based keys. First, generate a JWT_SECRET and set it in your .env:
openssl rand -base64 36ANON_KEY and SERVICE_ROLE_KEY are JWTs signed with that secret. From your recogito-studio directory, with JWT_SECRET already set in docker/.env:
JWT_SECRET="$(grep '^JWT_SECRET=' docker/.env | cut -d= -f2-)" node -e 'const c = require("crypto");const iat = Math.floor(Date.now() / 1000);const exp = iat + 60 * 60 * 24 * 365 * 10; // 10 yearsconst enc = (o) => Buffer.from(JSON.stringify(o)).toString("base64url");const sign = (role) => { const data = enc({ alg: "HS256", typ: "JWT" }) + "." + enc({ role, iss: "supabase", iat, exp }); return data + "." + c.createHmac("sha256", process.env.JWT_SECRET).update(data).digest("base64url");};console.log("ANON_KEY=" + sign("anon"));console.log("SERVICE_ROLE_KEY=" + sign("service_role"));'Copy the two printed values into ANON_KEY and SERVICE_ROLE_KEY in your .env.
URLs and Access
Section titled “URLs and Access”SITE_URLrequired — your client domain (https://client.example.com)API_EXTERNAL_URLrequired — your server domain (https://server.example.com)ROOM_SECRETrequired — generate withopenssl rand -base64 24MINIO_ROOT_USER/MINIO_ROOT_PASSWORDrequired — your login for the MinIO console. The password must be at least 8 characters.PGADMIN_ADMIN_EMAIL/PGADMIN_ADMIN_PASSWORDrequired — your login for pgAdmin. The email must be a valid address format, or the container won’t start.MAIL_FROM_ADDRESSrequired — sender address for system emails
Background Jobs (Trigger.dev)
Section titled “Background Jobs (Trigger.dev)”Project import/export requires Trigger.dev; see Set Up Trigger.dev for how to obtain these.
TRIGGER_PROJECT_IDrequired — project ref from the Trigger.dev dashboardTRIGGER_SECRET_KEYrequired — secret key from the Trigger.dev dashboardTRIGGER_SERVER_URLoptional — your instance URL; only when self-hosting Trigger.dev
Email (SMTP)
Section titled “Email (SMTP)”The stack does not include a mail server. The .env.example defaults (SMTP_HOST=supabase-mail) point at a placeholder that doesn’t exist, so user invites and password resets will not be delivered until you configure a real SMTP provider (e.g. Amazon SES, SendGrid, Mailgun, or your own mail server).
Set these to your provider’s credentials:
SMTP_HOST/SMTP_PORTrequired — your provider’s server and portSMTP_USER/SMTP_PASSrequired — your provider’s credentialsSMTP_SENDER_NAMErequired — display name on outgoing mailSMTP_ADMIN_EMAIL/MAIL_FROM_ADDRESSrequired — the “from” address (use one your provider is authorized to send from)ENABLE_EMAIL_AUTOCONFIRMoptional — set totrueto activate new signups immediately without a confirmation email. Defaults tofalse, which emails each new user a confirmation link they must click (requires working SMTP).DISABLE_SIGNUPoptional — set totruefor a closed instance where only invited users can create accounts.PUBLIC_ENABLE_USER_INVITEoptional — controls whether org admins can invite users from the User Management UI. Defaults toTRUE; set toFALSEto hide the invite feature.
Plugins
Section titled “Plugins”INSTALLED_PLUGINSoptional — plugins to install and compile into the client, as a comma- or space-separated list of npm package names. See the Plugins guide for the available packages.
6. Configure Nginx Routes
Section titled “6. Configure Nginx Routes”Each hostname you expose (see above) needs its own Nginx site configuration. The repo provides a template for each one—copy and customize them as follows.
Client Configuration
Section titled “Client Configuration”sudo cp ./nginx.client.example.com /etc/nginx/sites-available/<your client url>sudo nano /etc/nginx/sites-available/<your client url>Replace client.example.com with your actual client domain.
Server Configuration
Section titled “Server Configuration”sudo cp ./nginx.server.example.com /etc/nginx/sites-available/<your server url>sudo nano /etc/nginx/sites-available/<your server url>Update:
server_namewith your server URLAccess-Control-Allow-Originheaders with your client URL
Support Services
Section titled “Support Services”Repeat for remaining services:
sudo cp ./nginx.minio.example.com /etc/nginx/sites-available/<your MinIO url>sudo cp ./nginx.pgadmin.example.com /etc/nginx/sites-available/<your pgAdmin url>sudo cp ./nginx.portainer.example.com /etc/nginx/sites-available/<your Portainer url>Update nginx.conf
Section titled “Update nginx.conf”Add WebSocket support to /etc/nginx/nginx.conf:
sudo nano /etc/nginx/nginx.confAdd to http block:
map $http_upgrade $connection_upgrade { default upgrade; '' close;}Enable Sites
Section titled “Enable Sites”Create symbolic links:
sudo ln -s /etc/nginx/sites-available/<your server url> /etc/nginx/sites-enabled/sudo ln -s /etc/nginx/sites-available/<your client url> /etc/nginx/sites-enabled/sudo ln -s /etc/nginx/sites-available/<your pgAdmin url> /etc/nginx/sites-enabled/sudo ln -s /etc/nginx/sites-available/<your MinIO url> /etc/nginx/sites-enabled/sudo ln -s /etc/nginx/sites-available/<your Portainer url> /etc/nginx/sites-enabled/Test and restart:
sudo nginx -tsudo systemctl restart nginx7. SSL Certificates with Let’s Encrypt
Section titled “7. SSL Certificates with Let’s Encrypt”Install Certbot by following the official Certbot instructions for Nginx on Ubuntu, then issue a certificate for each of your five domains:
sudo certbot --nginx -d <your client url>sudo certbot --nginx -d <your server url>sudo certbot --nginx -d <your pgAdmin url>sudo certbot --nginx -d <your MinIO url>sudo certbot --nginx -d <your portainer url>Certbot installs a timer to renew certificates automatically. Confirm it works with sudo certbot renew --dry-run.
8. Run Installation
Section titled “8. Run Installation”Execute the installation script:
sudo bash ./install-self-hosted-docker.shRespond “Yes” to database push when prompted.
Set Up Trigger.dev
Section titled “Set Up Trigger.dev”Recogito Studio runs project import and export as background jobs on Trigger.dev, so a Trigger.dev project is required for those features (annotation and the rest of the app work without it). You can use managed Trigger.dev Cloud or self-host your own instance. Complete this before running the install script so the client starts with the correct values, or restart the client container afterward.
-
Get a Trigger.dev instance.
- Managed: sign up for Trigger.dev Cloud.
- Self-hosted: follow the Trigger.dev Docker guide (see the self-hosting overview for architecture). Run it on the same or a separate server; to reach it over the web, proxy it with Nginx + TLS at a hostname such as
trigger.example.com. Pin the instance to a version compatible with the client’s@trigger.dev/sdk(seepackage.json).
-
Create a project in the Trigger.dev dashboard and generate a secret key, then set the matching variables in
docker/.env:Terminal window TRIGGER_PROJECT_ID=proj_... # project ref from the dashboardTRIGGER_SECRET_KEY=tr_... # secret key from the dashboard# Self-hosted only—the URL of your instance. Omit to use Trigger.dev Cloud.TRIGGER_SERVER_URL=https://trigger.example.com -
Deploy the import/export tasks to your project. From a checkout of
recogito-client(note this is a different repo fromrecogito-studiowhich provisions the Docker containers), log in and deploy:Terminal window npx trigger.dev@latest login # self-hosted: add -a https://trigger.example.comnpx trigger.dev@latest deploySelf-hosted deploys also require Docker registry access—see the Trigger.dev deployment docs for the
docker loginstep.
Testing Your Installation
Section titled “Testing Your Installation”Test Client Access
Section titled “Test Client Access”Navigate to your client URL (https://client.example.com). You should see the Recogito Studio interface.
Sign in with:
- Username:
admin@example.com - Password: Value from
ORG_ADMIN_PWin your.envfile
Test Studio Access
Section titled “Test Studio Access”Navigate to your server URL (https://server.example.com) for Supabase studio access:
- Username:
supabase - Password: Value from
DASHBOARD_PASSWORDin your.envfile
Customization
Section titled “Customization”Branding (platform name, colors, logos, favicon) and sign-in methods are controlled by config.json. In the self-hosting repo this lives at docker/config/config.json, and the install script bakes it into the client image at build time.
To customize, edit docker/config/config.json before running the install script (Step 8). If you change it after installation, rebuild the client image (the upgrade flow does this). config.json also enables SSO methods (saml, keycloak) alongside the default username/password login.
See the Config Tool reference for the full schema (policies, roles, groups, branding, authentication).
Backups
Section titled “Backups”The stack stores your data in Postgres and MinIO. For production, set up regular database backups. The self-hosting repo documents a full pg_dump/restore procedure (including the storage-schema RLS policies that Supabase’s dump omits) in backup-and-restore.md.
Upgrading
Section titled “Upgrading”The recogito-studio repo ships an upgrade.sh script that performs the full upgrade for you: it pulls the latest client and server code, applies your config.json, rebuilds the client image, pushes database schema changes, and restarts the container.
From the root of your recogito-studio repo:
# Get the latest self-hosting repo (including the upgrade script)git pull
# Add any newly required variables from .env.example to your .envdiff ./docker/.env.example ./docker/.env
# Run the upgradechmod +x upgrade.sh./upgrade.sh
Building the new image and applying migrations usually takes a few minutes.
Manual upgrade (if you’d rather run each step yourself)
Run all commands from the base directory that contains your recogito-studio repo.
# 1. Pull the latest self-hosting, client, and server reposcd recogito-studio && git pull && cd ..git clone --single-branch --branch main --depth 1 https://github.com/recogito/recogito-clientgit clone --single-branch --branch main --depth 1 https://github.com/recogito/recogito-server
# 2. Build the client with your config and env varscp ./recogito-studio/docker/config/config.json ./recogito-client/src/config.jsoncp ./recogito-studio/docker/.env ./recogito-client/.envcd ./recogito-clientset -a && source .env && set +adocker build --no-cache -t recogito-studio-client:latest .cd ..
# 3. Apply schema changes and sync roles/policies to the databasecp ./recogito-studio/docker/config/config.json ./recogito-server/config.jsoncd ./recogito-servernpm installPGSSLMODE=disable npx supabase db push --db-url postgresql://postgres:$POSTGRES_PASSWORD@localhost:$POSTGRES_PORT/postgres --include-allnode ./create-default-groups.js -f ./config.jsoncd ..
# 4. Restart the client container with the new image, then clean upcd ./recogito-studio/dockerdocker compose -f ./docker-compose.yml -f ./docker-compose.client.yml up -d --force-recreate clientcd ../..rm -rf ./recogito-client/ ./recogito-server/
If you’ve made manual configuration changes (such as branding) to your live config.json, propagate them before copying it over in steps 2 and 3.